
A brake system inspection is a vital safety check that ensures your car can stop effectively. A typical inspection assesses the condition of brake pads, shoes, rotors, and drums; checks the brake fluid level and quality; and inspects lines, hoses, calipers, and cylinders for leaks or damage.
Your car's brakes are your first line of defense on the road. Failing to maintain them can lead to frightening scenarios where your car doesn't respond as it should. Regular inspections help catch small problems before they become big, expensive, and dangerous ones. This guide will walk you through everything you need to know about keeping your brakes in top shape.
I'm Howard Lutz, and with four decades in the automotive industry and over 25,000 vehicle inspections, I've seen the critical importance of a thorough brake system inspection. At Universal Inspections, my goal is to bring that same meticulous, unbiased assessment to you, ensuring your peace of mind before you buy a pre-owned vehicle.
Knowing when your brakes need attention is crucial for your safety. Driving habits, road conditions (city vs. highway), and even weather can impact how quickly your brakes wear. For instance, frequent stop-and-go traffic, heavy loads, or driving in areas where roads are salted can accelerate the wear and tear on brake components.
Your car often provides clear clues that it's time for a brake system inspection. Pay attention to these warning signs:
Squealing Noise: A high-pitched squeal when you brake often means the built-in wear indicators on your brake pads are touching the rotor. This is a reminder that your pads are getting thin.
Grinding Sound: A harsh, metallic grinding sound is a serious red flag. It usually means the brake pads are completely worn out, and metal is scraping against metal. This can quickly damage rotors and severely reduce stopping power. Get your brakes checked immediately.
Spongy or Soft Pedal: If the brake pedal feels squishy or sinks slowly, you could have air in the brake lines, low brake fluid, or a failing master cylinder.
Hard Pedal: A brake pedal that is very hard to press could indicate a problem with the power brake booster, contaminated fluid, or a blocked brake line.
Pulling to One Side: If the vehicle pulls to the left or right when you brake, it signals an imbalance in braking force. This could be caused by a stuck brake caliper, a collapsed hose, or unevenly worn pads.
Vibration: A vibrating or pulsating steering wheel or brake pedal, especially when braking from higher speeds, usually points to warped brake rotors.
Dashboard Warning Lights: The brake light or ABS light on your dashboard indicates a problem. It could be as simple as the parking brake being on, but it can also signal low fluid or a fault in the Anti-lock Braking System.
Even without obvious warning signs, proactive inspections are key. As a general rule, have a comprehensive brake system inspection performed every 10,000 to 12,000 miles or at least once a year.
Your driving habits are a major factor. If you do a lot of city driving with frequent stops ("severe" conditions), consider an inspection every 7,500 miles. For primarily highway driving ("normal" conditions), the 10,000-mile interval is usually sufficient.
Always consult your vehicle's owner's manual for manufacturer-specific recommendations. A professional brake system inspection is a quick process that can prevent major repairs and ensure your safety. For more DIY tips, you can check out resources like A DIYer’s Guide to Brake Inspection.
Knowing what's involved in a brake system inspection is important, whether you're a DIYer or rely on professionals. This checklist covers both common hydraulic systems and the air brake systems found on commercial vehicles. Safety First: Always work on a flat, solid surface. Use jack stands to support a lifted vehicle and chock the wheels remaining on the ground. Never rely solely on a jack.
A quick check is a brief visual scan for obvious issues, while a complete inspection is a thorough, in-depth assessment requiring tools and wheel removal.
Feature Quick Brake Inspection Complete Brake Inspection Purpose Rapid check for obvious issues, daily/weekly monitoring Thorough assessment of all components, preventative maintenance Wheels Removal No, typically done with wheels on Yes, wheels must be removed Time Required Approximately 5-10 minutes30 minutes to several hours (if repairs are needed)Tools Needed Flashlight, possibly a mirror Jack, jack stands, lug wrench, torque wrench, micrometer, ruler, various hand tools Visibility Limited to outer components (rotors, outer pad)Full access to all brake components Depth of Check Visual for major wear/damage, fluid level Detailed measurement of pads/rotors, caliper function, line integrity, fluid quality
This is a great regular check-up, especially with open-spoke wheels. First, check the brake fluid reservoir under the hood; the level should be between the "MIN" and "MAX" lines. Look through the wheels at the brake rotors (the shiny discs). Check for deep grooves, discoloration (a blue or dark tint indicates overheating), or excessive rust. Try to see the brake pad thickness; if the friction material looks thinner than its metal backing plate, it's time for a closer look.
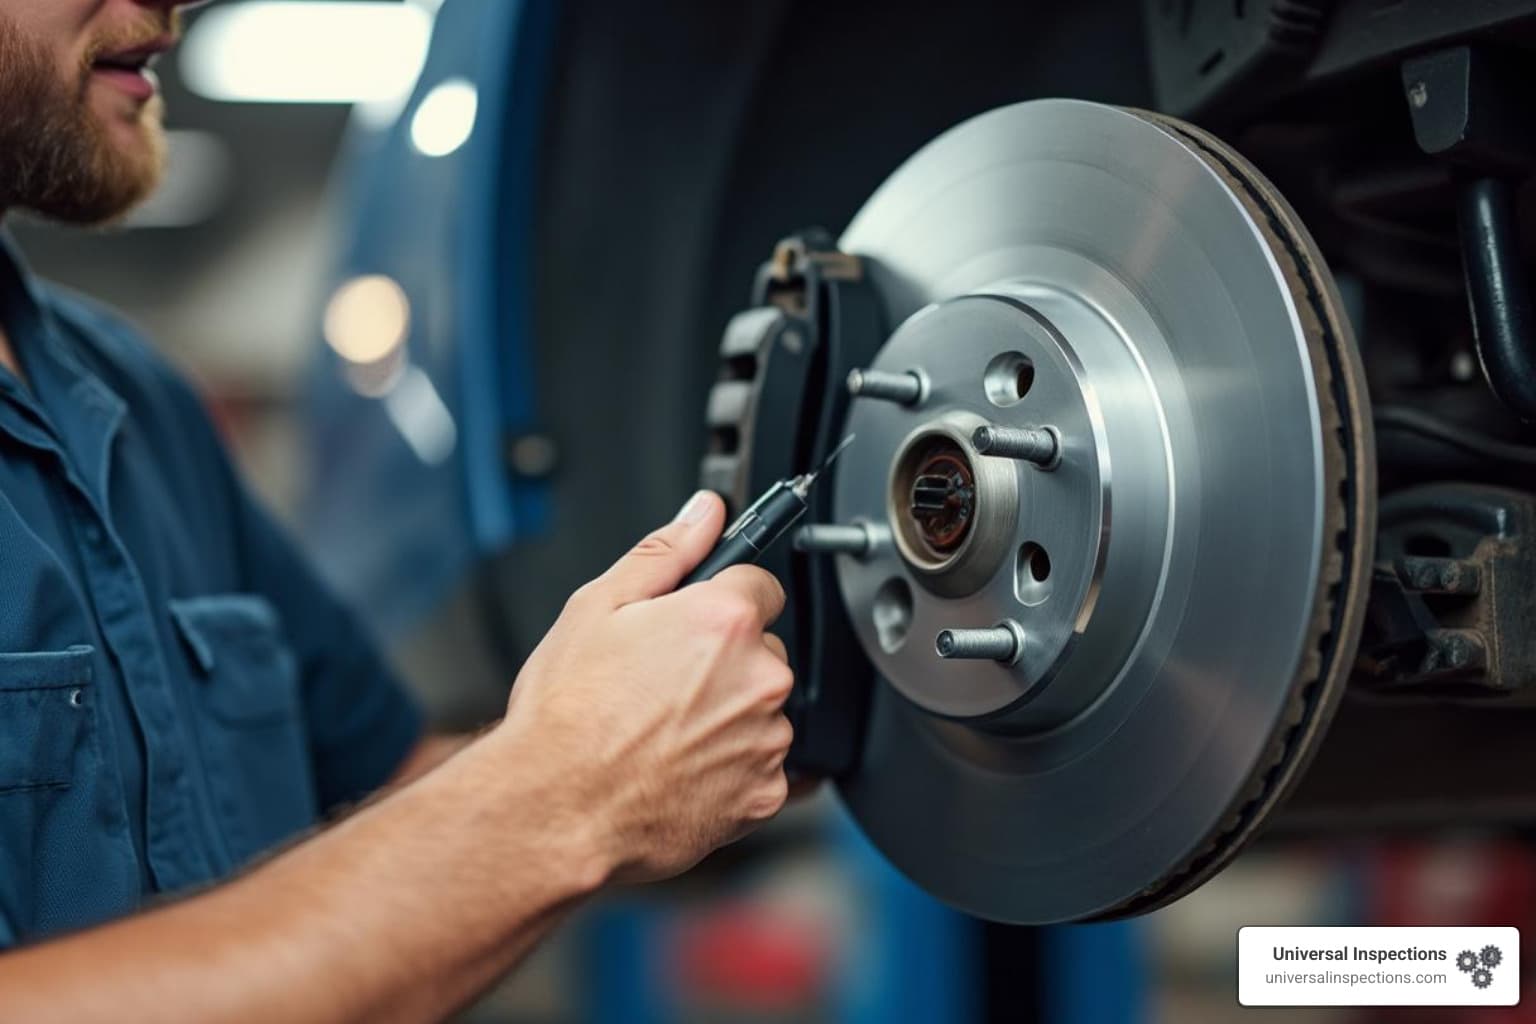
A complete inspection requires removing the wheels for full access, which is standard practice in our pre-purchase inspections. You'll need tools like a floor jack, jack stands, lug and torque wrenches, sockets, a ruler or brake pad gauge, and a flashlight.
Safety & Preparation: Park on a level surface, chock the wheels, and loosen the lug nuts. Lift the vehicle with a jack and secure it on jack stands before removing the wheels.
Master Cylinder & Pedal Test: Check the master cylinder's fluid level and condition (it should be clear or light amber, not dark and murky). Look for leaks. With the engine off, pump the brake pedal until firm, then hold pressure. If it sinks, there may be a hydraulic leak. Start the engine while holding the pedal; it should drop slightly and then hold, indicating the power assist is working.
Calipers & Wheel Cylinders: Inspect disc brake calipers for leaks or damage to the rubber boots. Ensure the caliper slide pins move freely to prevent uneven pad wear. On drum brakes, remove the drum and check the wheel cylinder for fluid leaks around its boots.
Pads, Shoes, Rotors & Drums: Measure the brake pad friction material; replace if it's at or below the manufacturer's minimum (typically around 1/8 inch or 3.2mm) or shows uneven wear. Inspect brake shoe linings for thickness and condition. Check rotor and drum surfaces for deep grooves, cracks, or signs of overheating (discoloration). Measure their thickness or diameter to ensure they are within the specified limits.
Hoses & Lines: Carefully inspect flexible rubber brake hoses for cracks, bulges, or leaks. Follow the rigid metal brake lines under the car, looking for rust, corrosion, kinks, or damage. Materials like Cunifer or stainless steel offer better rust protection than standard steel lines.
Reassembly: Reassemble all components, torquing bolts and lug nuts to the manufacturer's specifications. Pump the brake pedal until firm before driving.
For more information about our detailed inspection services, including comprehensive brake checks, please visit our Services page.
Air brakes on commercial vehicles require specific tests to ensure safety. Always secure the vehicle with spring brakes and wheel chocks before starting.
Low Air-Pressure Warning: The warning device must activate at or above 55 psi (380 kPa).
Air-Pressure Build-Up: Pressure should build from 85 psi to 100 psi (587 to 690 kPa) within two minutes at normal idle.
Governor Settings: The air compressor must stop pumping (cut-out) at or below 145 psi (1000 kPa) and restart (cut-in) at or above 80 psi (552 kPa).
System Air-Loss Rate: With the engine off and brakes applied, air loss should not exceed 3 psi/min for a straight truck, 4 psi/min for a single trailer combo, or 6 psi/min for a double trailer combo.
Spring Brake Test: With the spring brakes applied, the vehicle must not move when gently trying to pull forward in a low gear.
Air Tank Drain Valves: Drain all air tanks to check for excessive moisture or oil, which can indicate compressor problems.
For a highly detailed guide, refer to this S-Cam Brake Inspection Checklist.
Beyond sounds and feelings, a visual brake system inspection reveals the health of your brake components. Learning to spot these clues is key to diagnosing potential issues.
Brake fluid transmits force from the pedal to the wheels. It's hygroscopic, meaning it absorbs moisture from the air. This moisture lowers the fluid's boiling point, which can lead to vapor bubbles under heavy braking and cause a dangerous loss of stopping power known as "brake fade." Moisture also causes internal rust and corrosion.
New brake fluid is typically clear or light amber. If the fluid in your reservoir is dark and murky, it's contaminated and needs to be replaced. Contaminants like dirt or debris can clog lines and damage seals. To prevent these issues, most experts recommend replacing brake fluid every two years or 24,000 miles.
These components create the friction that stops your vehicle, making their condition critical for safety.
Brake pad wear should be even. Uneven wear patterns indicate problems:
Brake pad wear should be even. Uneven wear patterns indicate problems:
Tapered Wear: One side of the pad is thinner than the other, often due to seized or sticky slide pins on the caliper.
Uneven Inner/Outer Wear: If the inner pad is worn more than the outer, it can signal a sticking caliper piston or a blocked brake hose.
As a rule of thumb, if the pad's friction material is as thin as its metal backing plate, it needs replacement. Many pads also have wear sensors that create a squealing noise when low.
For the rotor condition, look for:
Deep Grooves or Scoring: Caused by worn pads or debris, reducing braking effectiveness.
Rust: Excessive rust on the braking surface can hinder performance.
Blue/Gold Discoloration: A sign of overheating from hard braking or a dragging caliper.
Warping: Though not always visible, a warped rotor causes a pulsation in the brake pedal or steering wheel when braking.
These components deliver hydraulic pressure and ensure the pads engage the rotors correctly.
A failing brake caliper can leak fluid or seize. It's important to distinguish between seized slide pins vs. a seized piston:
Seized Slide Pins: Prevent the caliper from aligning correctly, causing uneven or tapered pad wear.
Seized Piston: The piston inside the caliper gets stuck, causing the brake to either drag constantly or not apply at all.
Flexible rubber brake hoses degrade over time. Inspect them for cracks, bulges, leaks, or signs of internal collapse, which can trap fluid and cause a brake to drag.
Rigid metal brake lines are susceptible to rust and corrosion, especially in winter climates. Check for rust, kinks, or physical damage that could lead to a leak and catastrophic failure. Upgraded materials like Cunifer (copper-nickel alloy) or stainless steel offer superior corrosion resistance.
For an even deeper dive into the specific components and processes involved in a professional brake system inspection, you can explore our Service Details: Brake System Inspection.
Here are answers to some common questions about brake system inspection to help clarify any concerns.
Ignoring your brakes can have serious safety and financial consequences, including:
Reduced Stopping Power: Worn components increase the distance it takes to stop your vehicle.
Expensive Repairs: A simple pad replacement can escalate into a costly rotor and caliper job if ignored.
Catastrophic Brake Failure: A sudden fluid leak or seized component can lead to a complete loss of braking ability.
Compromised Safety: Neglecting brakes puts you, your passengers, and others on the road at risk.
These sensations are clear warning signs. Here are the likely causes:
A spongy brake pedal is often caused by air in the brake lines, low brake fluid, a failing master cylinder, or a degraded rubber brake hose.
A vehicle pulling to one side during braking usually points to an imbalance. Common causes include a stuck or seized caliper, a collapsed brake hose trapping fluid on one side, severely uneven brake pad wear, or contaminated brake pads.
For those performing a DIY brake system inspection, these tips are essential:
Safety First, Always! Work on a level surface and always use jack stands to support a lifted vehicle. Never rely on a jack alone.
Check Brake Fluid: Ensure the fluid level is between the "MIN" and "MAX" lines. If the color is dark and murky instead of clear or light amber, it's contaminated and needs to be flushed.
Visually Inspect Pads and Rotors: Look for deep grooves or discoloration on the rotors. Check pad thickness; if the friction material is as thin as the metal backing plate, they need replacing.
Look for Leaks: Carefully inspect all rubber hoses and metal lines for any signs of fluid leaks, cracks, bulges, or severe rust.
Know Your Limits. A DIY inspection is great for catching early warnings, but if you find something concerning or are unsure, consult a professional mechanic. It's always better to be safe than sorry when it comes to brakes.
A healthy braking system is not a convenience; it's vital for your safety. A thorough brake system inspection examines every component—from the fluid and lines to the pads and calipers—to ensure your vehicle can stop safely and reliably every time.
Being proactive is the smartest approach. Understanding the warning signs and adhering to recommended inspection schedules protects you from sudden brake failure and saves you from expensive, unexpected repairs. Whether you perform a quick visual check yourself or prefer the peace of mind that comes with a professional assessment, maintaining your brakes is a critical investment in your safety.
For those buying a pre-owned vehicle, this is even more crucial. You need to know the exact condition of critical safety systems before you buy. Universal Inspections offers comprehensive pre-purchase inspections across Alabama, Tennessee, and Mississippi. Our unbiased, detailed reports give you total peace of mind and we even work with extended warranty companies to verify vehicle issues.
Don't wait for a grinding noise or a pedal that sinks to the floor. Take charge of your safety on the road today.
Ready to ensure your next vehicle is a safe one? For a comprehensive pre-purchase car inspections that includes a meticulous brake system inspection, please Contact Us today. Your safety is our top priority.
